
Window tint is a great way to protect your windows from scratches and damage. Also, it helps keep the heat from getting into your home. However, nothing lasts forever, and even the best window tint will wear with time. Once that happens, your windows will have plenty of blurry spots, bubbles, and they might even become purple.
Replacing the tint regularly is essential if you want to have nice windows to look through. Still, while hiring a professional seems to be the easiest way to go, there is no need to waste your money on that.
Can You Remove Tint From Your Windows on Your Own?
Of course, you can! Removing tint from your home windows is not so complicated as it seems. In fact, removing the tint is much easier than installing it.
If your windows don’t come with a warranty, which they probably don’t, you have only two options — hire a professional or do it yourself. However, professional tint removal can be quite pricey. So, doing it yourself will save you some money. These extra funds are especially important if you want to install a new tint which can also be pretty expensive.
So, if you want to remove tint from your home windows, you just have to follow this simple guide. After all, all you need is some free time and a positive, can-do attitude.
When Is the Right Time to Remove Tint From Home Windows?
The longevity of window tint depends on various factors. The most important one is the tint quality. Cheap, low-grade tint can start to wear after only a couple of months.
However, with good tint, your windows can look great for an extended period of time. Depending on the type of tint, it can last between 5 and 10 years, or even longer.
The weather conditions are another crucial factor. If your windows are exposed to sunlight all day long, the tint will show signs of wearing much sooner.
So, how do you recognize when it’s the right time to remove the tint from your home windows? It’s rather simple — worn tint usually gets faded and blurry, which is easy to notice.
Also, when the glue between the field and the window starts failing, bubbles will appear. In addition, once the non-metallic dyes in the tint film start decomposing, the tint will change its color. So, if you notice your windows seem purplish, it’s high time you changed the tint.
Best Ways to Remove Tint From Windows
In most cases, window tint is glued with some adhesive. However, simply peeling it off with your hands is not enough. If you do so, your windows won’t be damaged, but they’ll still be incredibly sticky.
Naturally, you want to avoid this. So, let’s take a look at the two best methods of tint removal.
The Ammonia Method of Tint Removal
Using ammonia to remove tint from your home windows is one of the easiest methods. Moreover, all the tools that you need for this method are probably already in your kitchen or toolbox. If not, you will probably find them in the closest store.
So, here is what you need to get:
- Ammonia
- Liquid soap or baby shampoo
- A spray bottle
- A blow dryer
- Either a window washing scraper or a straight edge razor
- Plastic wrap
- Paper towels
- Ammonia-based window cleaner
- Optional: ammonia-free and vinegar-free window cleaner
Still, while ammonia is great at dissolving adhesives used for window tint, you should bear in mind that this process might take a couple of hours.
Step 1: Dissolving the Adhesive
First, mix ammonia with liquid soap or baby shampoo in a spray bottle. Then, spray the windows thoroughly with this mixture. Wait until the windows dry a bit and then respray a couple of times.
In order to speed up the process, you can cover the ammonia-soaked windows with a plastic wrap or a film. It will hold the moisture in, so it will dissolve the adhesive faster. If you don’t have a plastic wrap at hand, you can also use a regular trash bag. For best results, leave the wrap overnight.
You should keep in mind that ammonia is unhealthy to breathe in. Also, the fumes might harm the furniture and electronics. Therefore, make sure to air the room well during this process.
Step 2: Loosening the Tint
Once you take the wrap off, you need to loosen the tint. The best way to do this is to heat the windows as much as possible. Heat is quite effective, and it will make the tint much easier to release.
The best way to achieve this is with a blow-dryer. Alternatively, you can use a steamer. In addition, if your windows are in the sun, the tint will peel off faster. So, make sure to remove the tint during the day.
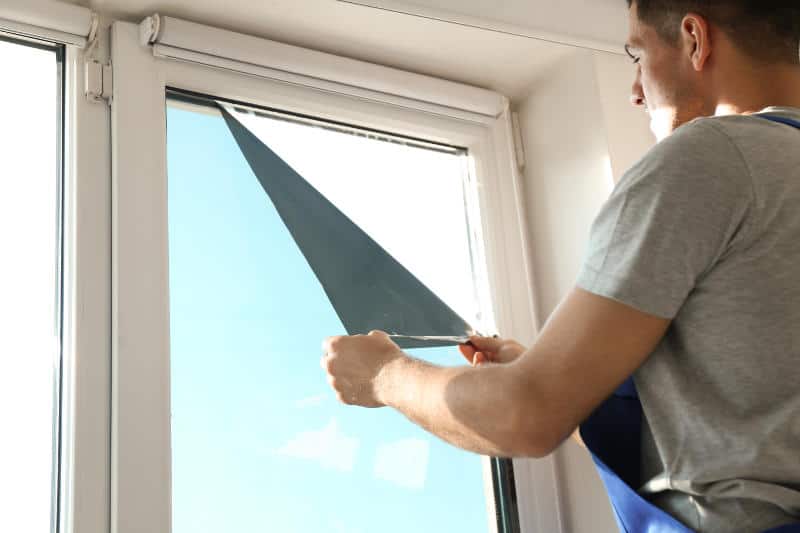
Step 3: Peeling the Tint Off
If you manage to loosen the tint properly, you will be able to peel it off quite easily. Use a window-washing scraper or a straight-edge razor to scrape it away. If the windows are warm enough, the tint will peel fast, in large sheets.
However, it can happen that the adhesive is not dissolved completely. In that case, the tint will be harder to peel off, and it will come off in small flakes. If that happens to you, don’t worry. All you need to do is to spray some more soapy ammonia on your windows and use the blow-dryer to warm them enough. You just need to be patient.
Step 4: Washing the Windows
Once you have removed the tint, you need to wash your windows well. The best way to do so is to wash them with an ammonia-based cleaner, as it will remove the remaining bits of the film or adhesives.
However, if you are planning to put the new tint on your windows, bear in mind that ammonia will prevent the adhesive of the new tint from sticking properly. In this case, you should use an ammonia-free and vinegar-free window cleaner.
Finally, dry your windows with paper towels. If there are any water traces left, use a microfiber cloth to remove them.
Extra tip: If you can’t find ammonia, use vinegar instead. The results will be the same, although the dissolving process might take a bit longer.
Removing Window Tint With a Steamer
If you want to avoid the harmful effects of ammonia, you can remove the tint from your windows with a steamer. However, this method is time-consuming and inconvenient for large windows. Also, you will need to access both sides of the windows. Thus, if you don’t live on the first floor, the ammonia method will be much easier for you.
Still, let’s take a look at what tools you will need:
- A handheld steamer (e.g., a clothing or upholstery steamer)
- One straight razor
- Window cleaner
- Water
- A spray bottle
- A non-scratch pad
- Paper towels
Step 1: Steaming the Windows
First, steam the entire outside of your window with a handheld steamer. If you can’t access the outside, bear in mind that this step is not necessary. Still, steaming the outside will warm the windows well, which will speed up the process, and the tint will fall off more easily.
Once you are done with the outside, steam the inside of your window. To achieve the best results, you should steam each side of the window for about 7 minutes.
During this step, make sure to sweep the window from the top to the bottom. Also, try to heat the window evenly. The best way to achieve this is to hold the steamer between one and two inches away from the pane.
Step 2: Lifting the Edge
Once your windows are warm enough, use the razor to lift the edge of the tint. To do so, place the razor under the tint at one of the inside top corners. Carefully loosen the edge. If the tint is not loose enough, apply some more steam and give it another try.
Step 3: Peeling the Tint Off
Once you have lifted the edge, peel the tint off slowly. At the same time, keep steaming the window. Don’t forget that the steam is hot, so try not to burn yourself.
The best way to peel the tint off is to work from the top to the bottom. Also, you should do this slowly. Otherwise, you might tear the tint.
Step 4: Cleaning the Windows
When you remove the tint from your windows, you will probably find some remaining adhesive. To clean it off, mix a window cleaner with some water in a spray bottle, and apply the mix on the windows. When scrubbing the glue spots, use a non-scratch pad. Finally, dry the windows with paper towels.
The Bottom Line
As you can see, removing the tint from your home windows is rather simple. So, arm yourself with patience, find some free time, and make your windows shiny again. Just follow this simple guide, and your windows will look brand-new in no time.


