
Privacy is an important consideration in any living situation, but not everyone has the luxury of a large home. Thankfully, with a bit of creativity and a reasonable budget, a temporary door can be a practical solution to enhance privacy in your space.
Temporary doors for hallways come in various shapes, sizes, and levels of privacy. Whether you’re looking for a simple solution like beaded curtains or a more substantial option like sliding barn doors, there’s a temporary door to fit every home and budget.
In this article, we’ll explore why people choose to use temporary doors, the different styles available, and how to install them.
Why Use Temporary Doors in Hallways?
For many people, a temporary door in a hallway is a great, low-cost way to improve privacy for the people in shared living spaces.
It is also an excellent option for people that rent their houses, as landlords rarely allow for the addition of structures like a door frame that would offer a more permanent solution to shared living spaces. However, we will take a look at some of these more elaborate options as well.
Families
Many families live in smaller homes than they might prefer, and as children grow up, the space they require and their demands for privacy expand as well. This is especially true as children become teenagers, as any parent will tell you.
For just this reason, a temporary door in the hallway is an excellent idea for angsty teens that “need their space.”
There is another trend that has spurred parents to look into temporary doors as a means to improve privacy.
According to the New York Times, 15% of Americans between the ages of 25 and 35 are living with their parents. In the year 2000, that number was around 10%, while in 1981, only an estimated 8% of those same-aged adults lived with their parents.
The growing number of adults moving back in with their parents has led to an increased interest in temporary doors for privacy.
Shared Housing
Another demographic that can significantly benefit from temporary hallway doors are those folks living in shared housing situations.
The number of Americans living in shared housing is estimated at 25% of the population between the ages of 18 and 34. In large urban centers, these numbers can be even higher: according to an article in The Atlantic, nearly half of all adults in Los Angeles live in some form of shared housing with non-family members or spouses.
5 Great Ideas for Temporary Doors in Hallways
As we can see, the demand for temporary doors is at a premium, so let’s take a look at some options that range from simple to full-on DIY projects.
1. Beaded Curtains
These decorative dividers are a great way to split space with minimal effort, while simultaneously adding a unique and attractive twist to your home’s decor.
Beaded curtains gained massive popularity in the 1970s and have made a recent comeback with dozens of options available from suppliers like Amazon and Alibaba. There is even the ABeadedCurtain 125 String Louver Beaded Curtain that mimics the look of an actual door.
They don’t provide the same privacy level as some of the other options we will look at, but there is no denying the style and appeal of these exotic dividers, making them an easy and low-cost alternative.

- Truly a piece of hand painted artwork. Fits most...
- Each bamboo curtain is 36" x 79" with 125 strands...
- Each curtain contains approx. 4000 beads and each bead...
- Currently the highest quality bamboo beaded curtain...
Installation
There are a couple of options for installing beaded curtains in a hallway. The easier one is to use a telescoping rod like the Beokreu Telescoping Curtain Rod that uses springs to provide the tension that holds your beads in place. This is a good choice because these telescoping rods can be placed anywhere in a hallway; a door jamb is not required.
Simply extend the curtain rod until it is firmly wedged between either side of the door jamb and hang the beaded curtain from curtain hooks.
A more durable option requires an electric drill to mount eye screws in the top of the door jamb, with the curtain rod itself suspended below them with curtain hooks.
Use a pencil to mark the appropriate location, drill holes (2 should be enough), install eye screws, and attach the curtain to the eye screws with curtain hooks.
Within a matter of minutes, you will be admiring your chic new room divider.
2. Tapestries and Wall Hangings
Tapestries have long had a place in the home decor of college students and recent graduates, but this low-cost privacy solution can be just as useful in a family home.
Coming in an endless variety of patterns and designs, a simple fabric divider can be found for every motif. Once again, they won’t do much in terms of insulating against sound, but hanging a tapestry at the entrance of a hallway is a great way to produce the feeling of separation that improves privacy.

- 【Size】 36 inches x 48 inches
- 【Design】This is a black tapestry inspired by the...
- 【Quality】Made from 100% polyester fiber.Good...
- 【USE】Great for Wall hangings,Bedroom Decorations...
Installation
The installation process of hanging a tapestry is similar to that of beaded curtains. It can be as simple as using a telescoping curtain rod or as complicated as installing brackets to form a more permanent and durable solution.
We should note, however, that it is not a good idea to put nails or screws directly through the tapestry as this will leave you a torn piece of fabric that could eventually be ripped down by unruly children. Not to mention the damaged wall.
3. Privacy Screens
One step up from beaded curtains on the privacy continuum, these Japanese-style screens are a great way to increase privacy and improve the look of an apartment or home.
Originally these dividers were made out of wooden frames with paper screens, although many modern versions often use synthetic materials to cut down on costs and improve durability.
While they obviously won’t insulate against sound, these lightweight screens are easy to move, making them an excellent option for living situations where you don’t require more permanent privacy solutions. Privacy screens come in a variety of styles, from the traditional Roundhill 4-Panel Screen Room Divider to the rustic Giantex 6 Panel Wood Room Divider, so you are sure to find the right style to match your home decor.

- Japanese-inspired room divider for creating privacy in...
- Panels fashioned from white rice paper with a red and...
- Ready to use instantly, easy to move, folds flat for...
- Items may slightly different from photo in terms of...
Installation
Besides being an elegant privacy solution, these screens require zero installation and can be relocated at the drop of a hat.
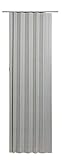
4. Vinyl Accordion Doors
These are a great option that provides an added level of privacy and can even help reduce the sound that travels from one room to another. This style of door uses a hollow core design that reduces weight while maintaining strength and rigidity, making this ideal for family homes with children.
Unlike some of the previous options, vinyl accordion doors require a frame for installation, so they must be hung in a doorway, and not at any point in a hallway.
These doors are a bit more expensive than a wall hanging, and they also require more effort in installation, so we will take a more in-depth look at how you hang accordion doors in a hallway.
- Durable Vinyl Slats – Woven with matching binding...
- Complete Kit – Includes track, hardware, and easy...
- Double Door Option – Two doors can be installed...
- Budget Friendly – An affordable and practical option
Installation
You will need:
- Cordless drill
- Tape measurer
- Hack saw
- Sandpaper
- Lubricant
All screws and fasteners will be supplied with the door.
- Measure the width of the door frame.
- Use the hacksaw to cut the door track ⅛ inch narrower than the width of the door frame. This allows the track to pivot when installing the door.
- Sand down the cut edges to get a smooth surface.
- Use the drill to place a hole in the middle of the top of the door frame and then mount the door track at this location with a single screw. Your track should be able to pivot perpendicular to the door frame at the center point, allowing access to the rail.
- Lubricate the track with graphite or petroleum jelly to ensure smooth movement of the door.
- Attach the two handles to either side of the door with the fasteners provided.
- Carefully slide the top guides into the track.
- Turn the track parallel to the door frame and install the remaining screws in the top of the door frame.
- Slide the anchor section of the door to the edge of the door frame and mount it using the drill and screws provided.
- Mark the location where the door touches the wall when closed with a pencil.
- Screw the striker plate to this location.
There are a number of YouTube videos that can provide a more detailed guide to installation as well. In this video, by LTL Home Products, a step-by-step guide on how to properly install LTL Home Products HZ3280H Horizon Interior Folding Accordion Door:
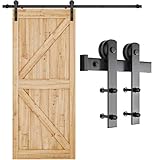
5. Sliding Barn Doors
This is an option that begins to blur the lines between temporary and permanent; however, these unique barriers are an excellent solution that will provide real privacy. While many people choose to leave the installation of these doors to a professional, with a few tools and a bit of know-how, you can hang sliding barn doors in your home yourself.
We will lay out a guide that will give you a good idea of the scope of the installation process and whether you feel it is a DIY task you might feel comfortable attempting. Many home improvement stores sell barn door kits with all of the hardware and fasteners included, as well as having a wide selection of doors to fit your home and decor.
- [Barn Door Hardware Kit Material]: Barn door track is...
- [Sliding Barn door hardware kit Included]: A Barn Door...
- [Born Door Weight Capacity]: The Sliding Barn door...
- [Easy to Install]:Sliding barn door hardware kit...
Installation
You will need the following tools:
- Cordless drill
- Tape measurer
- Level
- Stud-finder (optional)
You will also need the following materials:
- Pre-measured door
- Track
- Door hangers
- Rollers
- Door guides
- Door stops
- Jump stops
- Spacers
- Fasteners
Once again, all of the required hardware and fasteners will be provided in a pre-packaged kit.
- The first step is to find the studs above your door frame that you will mount your hardware to. You can either use a stud-finder or the old fashioned tap-and-listen method.
- If the studs don’t line up with your hardware or simply for more sturdy construction, mount a woodblock as a header-board to the studs to which you then attach the rail. Do not attach the rail directly to drywall without studs.
- Use your level to make sure that the woodblock is level, and mount it to the corresponding studs using the electric drill and the provided fasteners.
- Once the header-board is attached, use the drill to mount the rail, making sure to keep it level as you proceed. This is also the step where you will place the spacers between the rail and the wall to ensure that your door slides freely.
- Place your door against the jamb and measure the correct distance from the rail to the top of the door. Mark the location to mount your hanger-roller assemblies to the top of the door and pre-drill your holes. Make sure that you use a bit of wood to prop the door up off the floor so that when it is hung, it will slide freely.
- Attach one hanger-roller assembly on either side of the door, utilizing the level to make sure they are even.
- At this point, you can hang your door on the rail to find the correct locations on the floor to mount your door guide. This will also give you the opportunity to check how far you want your door to slide in either direction, so you know where to place the stops.
- On either end of the track, at the locations, you wish the door to stop, mount the hardware that prevents the door from sliding off the rail when opening and closing.
- Mount the door guide on the floor in a position that keeps the door from swinging out and away from the wall while it is sliding, but doesn’t restrict the lateral movement of the door.
And just like that, you’re done!
As you can see, this isn’t the simplest of installations, especially compared to some of the other temporary door options we have looked at. However, it is far from impossible and is worth the time and effort to drastically improve your home privacy.
If you feel that a sliding barn door is the solution to your privacy concerns and are up to the challenge, there are a number of excellent how-to guides on Youtube that provide step-by-step instructions that will make the process even easier, like this video below:
To Conclude
Everyone values their privacy, and with the rising numbers of Americans renting homes and living in shared spaces, temporary doors for hallways are the only solution for many people.
However, as the different styles of dividers we have examined demonstrate, just because it is a temporary solution doesn’t mean it can’t be an attractive and effective way to improve privacy in your home.


