
Garden hoses typically range from 10 to 100 feet, but sometimes that’s just not enough. Whether you’re setting up an irrigation line or filling a pond tucked deep in your yard, extending your hose is often the simplest solution. Luckily, connecting two hoses is quick and easy, and only requires a few basic tools.
This guide will walk you through how to connect two hoses using standard fittings, couplers, quick connectors, and adapters (for mismatched sizes). Let’s get started.
1. Connect Two Hoses of the Same Diameter With Connectors
New hoses come equipped with fittings that attach together using male and female thread connectors. These hose connectors make it possible to quickly connect two hoses by screwing the male and female parts together.
Since hoses come with these fittings, you shouldn’t need to make a special purchase unless the parts have been removed or the hoses are of a different diameter.
Garden hoses come in three different diameters, including:
- 3/4-inch
- 5/8-inch
- 1/2-inch
The 5/8-inch diameter is considered the standard.
If both ends of the hoses are male parts, you’ll need a male-to-male adapter.
Male connectors feature threads on the outside of the fitting, whereas female connectors feature threads on the inside. Attach the two hoses of the same diameter by attaching the male connector to the female connector.
- Attach the hose to the spigot.
- Turn off the water source to avoid becoming drenched.
- Locate the male and female connectors on the hoses.
- Attach the connectors by screwing them together.
After screwing the hoses together, check to make sure they’re not lopsided or misaligned. This may cause leaks and could cause issues when attempting to detach the hoses.
Installing New Connectors on Hoses
If the ends of your hoses are plain rubber with no connectors at all, you’ll have to install new connectors to make it possible to attach hoses together.
Before shopping for new connectors, measure the internal diameter of the hose. As mentioned earlier, standard hoses measure 5/8-inch, but others come in 3/4- or 1/2-inch. You must ensure an accurate measurement to purchase the appropriate fitting.
After determining the proper size, check if you’ll need a male or female connector (or both).
I recommend the YELUN Solid Brass Garden Hose Repair Connector, available on Amazon. This repair set comes with 3 male and 3 female connectors, 6 stainless steel tightening clamps, and 6 rubber gaskets. It’s available in ¾-inch, ⅝-inch, and ½-inch sizes.
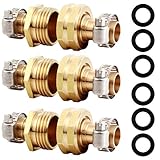
- The product contains 3 pcs male + 3 pcs female garden...
- Standard 5/8" US thread garden hose connection, and our...
- Sturdy material: these hose connectors are made of...
- Note:1.Keep the water pipe incision flat.Tighten...
Here’s how to install the connectors onto your hose:
- Cut two inches off of the hose. Ensure that you cut in a straight line using a sharp utility knife to avoid jagged edges. Rough edges may prevent adequate connection.
- Prepare vinyl hoses for placement of the rod. Vinyl hoses are notoriously difficult to manipulate, so you should soak the end in hot water for at least 10 minutes before attempting to attach the rod.
- Attach the rod to the hose. Shove the rod into the end of the hose, pushing it in as far as possible until the connector’s edge sits flat on the edge of the hose.
- Place the tightening clamp on the hose. Insert the screw to connect the tightening clamp together.
- Tighten the clamp. Use a screwdriver to tighten the clamp to prevent leaks.
Once you’ve successfully installed the new connectors, you can screw the two hoses together by attaching the male connector to the female piece.
2. Connect Two Hoses Without Standard Fittings Using Couplers
You can still attach hoses together, even if they don’t have standard connectors. The easiest way to do this is by using a coupler. If you want to use a coupler, but the hoses do have standard fittings, you’ll have to remove the existing fittings prior to installing the coupler.
Hose couplers look like skinny metal cylinders with barbed edges on each side. The couplers slide into the rubber ends on both hoses, and these textured edges allow the rod to stay put. Once secure, the rod is tightened using metal clamps secured with screws to prevent leaks.
I recommend the Metaland Brass 5/8” Hose Barbed Coupler. This coupler comes in the standard hose size (other diameters are available) and includes two barbed fittings. It works with water pressure up to 300 psi.
- The product contains 3 pcs male + 3 pcs female garden...
- Standard 5/8" US thread garden hose connection, and our...
- Sturdy material: these hose connectors are made of...
- Note:1.Keep the water pipe incision flat.Tighten...
Installing couplers on hoses is straightforward and, in most cases, takes less than thirty minutes. Before installing couplers, know that you can only attach hoses of the same sizes using these devices.
Here’s how to attach two hoses using a coupler:
- Remove the current fittings on the hoses, if any. Cut two inches below the fittings on each hose with a utility knife. Ensure that the cuts are straight for a smooth connection.
- Prepare vinyl hoses for coupler insertion. If you’re using vinyl, soften the hoses before installing the coupler by soaking the ends in hot water for 10 minutes.
- Insert one end of the rod into the end of one hose. Push it all the way until the raised center piece rests against the edge of the hose.
- Push the other hose to the other end of the barbed rod. Force the hose onto the barbed rod until it meets the raised center piece and sits flush with the hose’s edge.
- Attach tightening rings on each side. Insert the included screws on each clamp.
- Tighten the clamps. Use a screwdriver to tighten both clamps to secure the rings in place and prevent leaks.
3. Affix Two Hoses While Water Runs Using Quick Connectors
Standard connectors and couplers make it nearly impossible to connect two hoses while the water runs. You’ll likely end up drenched and frustrated — it’s difficult to attach parts as water runs through the hose. Quick connectors eliminate this problem, as they allow you to attach hoses while the water flows.
Some situations require a longer hose, and quick connectors are the best solution. They prevent you from having to walk back to the spigot to shut the water off before connecting a new hose.
When using a quick connector, the hoses must have existing standard fittings. If the hoses aren’t already equipped with them, you’ll have to install them yourself (see the first section for instructions on installing standard fittings).
Attach quick connectors by screwing the male end of the quick connector to the female fitting on the hose. Then, screw the male end of the quick connector to the female end of the other hose. Once the quick connectors are securely attached, they’re ready to use.
Here’s how to use quick connectors:
- Locate the female connector. Pull back on the ring to engage the spring.
- Attach the male connector to the female connector. Push it in, ensuring it’s aligned.
- Release the ring on the female connector. This activates the spring and locks the male and female pieces together to ensure a stable, leak-free connection.
To disconnect the hoses, unscrew the male and female connectors. Take the adapter off and place it in a safe area for later use.
I recommend the STYDDI Brass Quick Connect Fittings, available on Amazon. This product includes two sets of quick connect 5/8-inch fittings to attach two hoses without affecting the water flow rate. They feature easy connection and disconnection to make it easy to get the job done with less hassle.
4. Connect Two Hoses of Different Sizes Using Adapters
Sometimes, you may need to attach two hoses of different sizes. In these cases, standard fittings and quick connectors rarely work. These attachments typically require the hoses to be of the same size. When attaching two hoses of different diameters, you’ll need a narrowed or multi-hose adapter.
Narrowed or multi-hose adapters don’t work with standard hose fittings, however; you’ll need to remove them prior to installing the adapter.
Here’s how to find and install adapters to attach two different hoses:
- Determine what size adapter you’ll need. Measure the diameter of both hoses.
- Remove any existing fittings. Cut the hose two inches below the fitting with a utility knife.
- Attach the adapter. Install them to each hose by shoving the ends into the fitted pieces until they can’t move any further.
- Affix the clamps. Slide the clamps onto each side and screw them in place.
- Tighten the screws. Avoid crossing the thread to ensure a tight seal.
A great option is the Laguna Multi-Hose Adapter. It allows you to attach hoses from 1/4-inch to 1-inch in diameter. It includes metal clamps and gaskets for a tight seal.
Alternatively, you can try the Uenede Solid Brass Reducer Fittings. This fitting comes with two brass fittings and two clamps to transform a 1/2-inch hose into a 5/8-inch hose. There are other size options available.
Final Thoughts and Tips
Connecting two hoses is a simple and cost-effective way to get the reach you need for larger garden projects. Whether you’re working with hoses of the same size or different diameters, there’s a solution that fits. Most fixes can be done in under 30 minutes with just a few basic tools, making them perfect for DIYers of any experience level.
Before we wrap up, here are some additional tips to help you get better results:
- Always check for leaks after making a connection, especially if you’re using clamps or couplers. A small leak now could turn into a bigger issue later.
- Use plumber’s tape on threaded fittings for a tighter, leak-resistant seal.
- Keep spare parts handy. Having extra clamps, gaskets, and a multi-hose adapter in your shed can save you a trip to the hardware store.
- Label or color-code your hoses if you use different sizes regularly. It’ll make matching parts and connectors much easier in the future.
- Store hoses properly by coiling them loosely and keeping them out of direct sunlight to extend their lifespan and prevent cracking near the fittings.
With the right parts and a little know-how, you’ll have your hoses connected and your garden projects back on track in no time.


")

